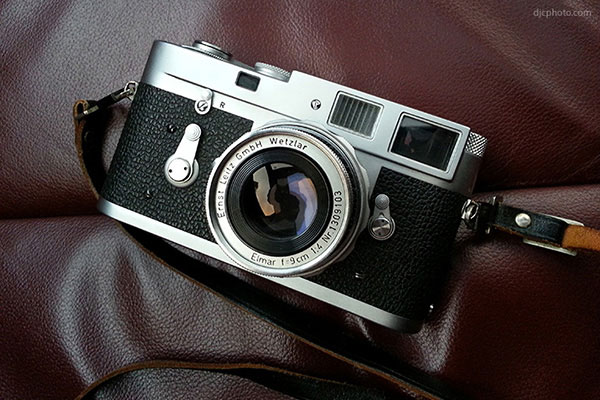
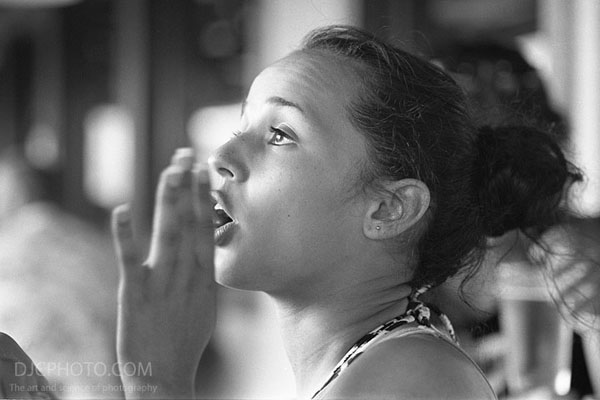
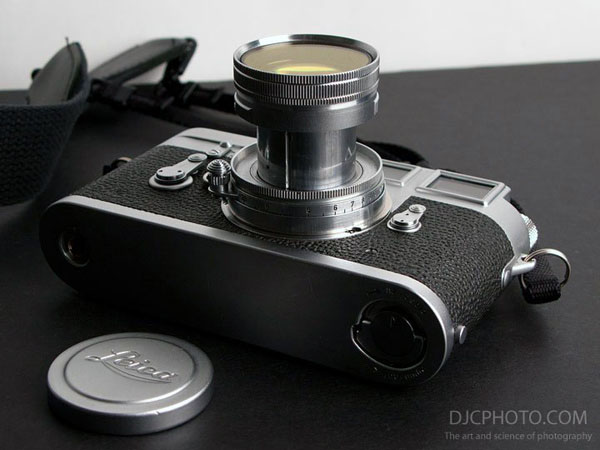
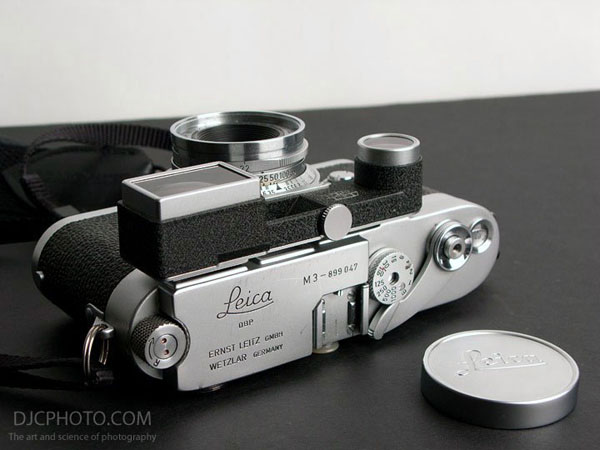
Since getting a Leica M3 the year before last, I’ve come to really appreciate the combination of compact design, excellent build quality and fantastic lenses that the system offers, so when I saw a 1965 M2 for sale locally, I decided that I really needed a backup body and snapped it up.
The camera itself is great; there is some cosmetic wear as is to be expected on a camera of this age, but after a bit of a clean up, and some dry-firing of the shutter, everything is working smoothly. The deal was also sweetened by the inclusion of a 1955 90mm F/4.0 collapsable Elmar lens, and although I already have two other lenses of this focal length, I was intrigued to see how it would perform.
Leica M2 with 90mm F/4.0 Collapsable Elmar
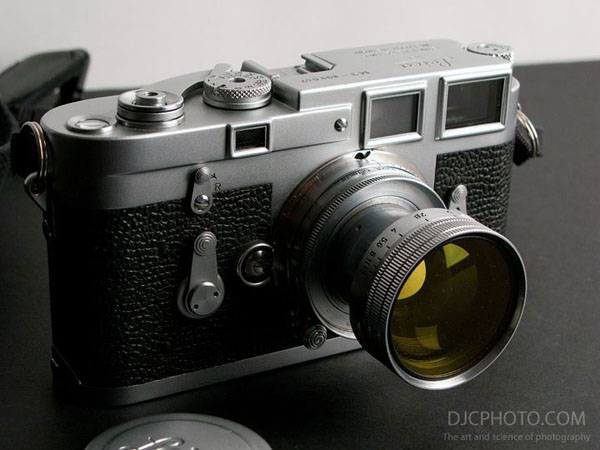
As the name would suggest, this lens can be collapsed into the camera body for carrying or storage and, in this position, it is no larger than some 50mm lenses of the era. To take a photograph, the lens is pulled out from the body and rotated into the locked extended position, which also disengages the focus lock mechanism that prevents the focusing ring from turning while collapsed.
Mechanically, this lens is a jewel! The quality of the fit and finish is superb, and the aperture and focusing rings operate with a precision that is sadly missing from a lot of modern gear. The solid all-metal construction gives great confidence in use, and feels great, although it’s no lightweight because of it.
Optically, it’s a simple lens, based as it is on the Tessar formula, but what really matters is how the photographs taken with it look, and in that respect, it really performs! The following images are all shot at the maximum aperture of F/4.0 and show very well the sharp, low contrast characteristics of this fine vintage lens.
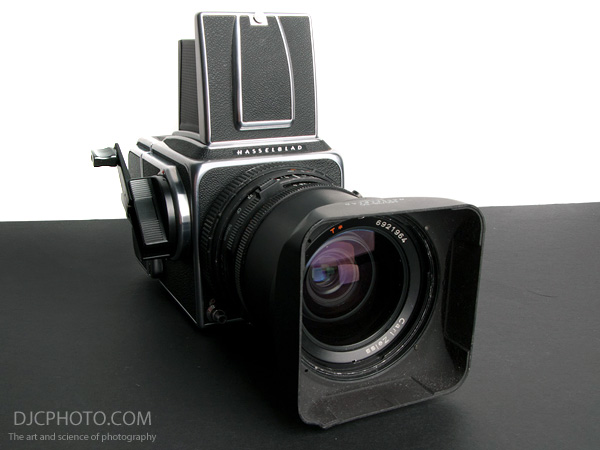
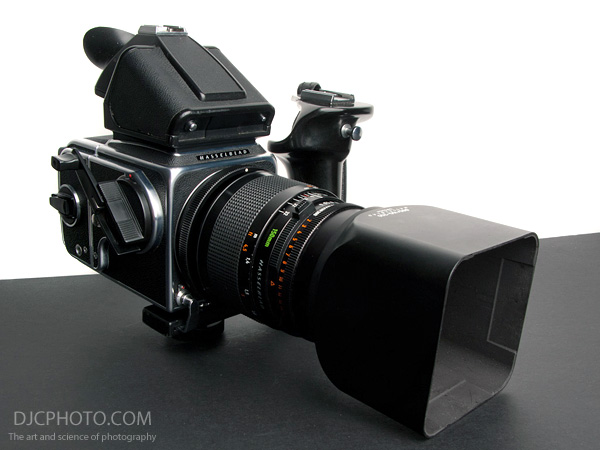
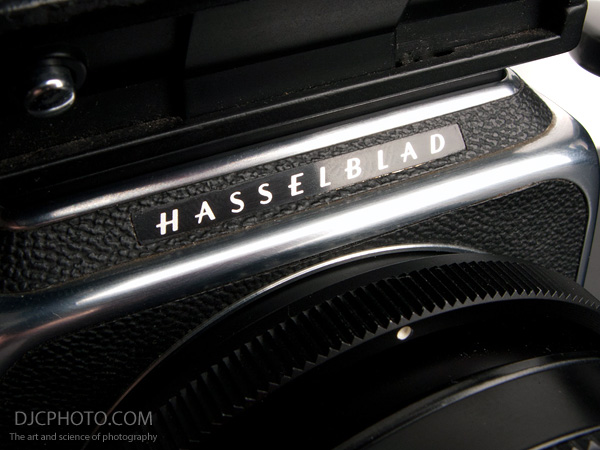
Hand-built in Sweden, the Hasselblad 500 series of cameras is one of the most popular medium format systems of all time. The brainchild of Victor Hasselblad, the original 500C model, launched in 1957, was also one of the first true system cameras. It embodies a modular design that allows components to be mixed and matched with ease to create the perfect camera for any specific assignment.
Hasselblad 500C/M – Swedish beauty!
In this article, I will explain some of the features and benefits of this superb photographic tool and also discuss a few different configurations of the fully mechanical 500C/M model that demonstrate the flexibility of the Hasselblad V system.
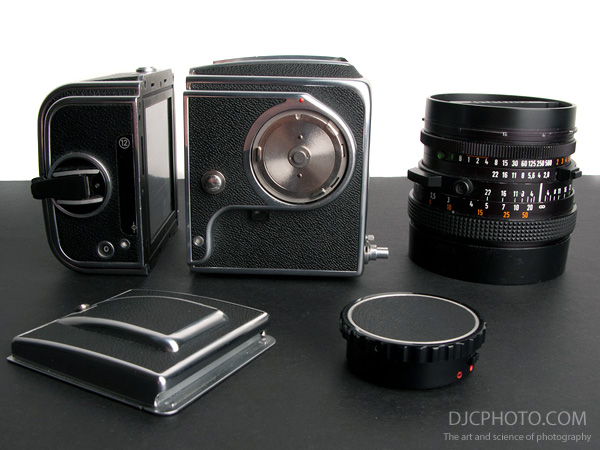
Hasselblad V System components
The basic V system camera consists of four main interchangeable components; lens, body, film back and viewfinder. Let’s take a more detailed look at each of these.
The Lenses
The single most important component on any camera is the lens. No matter how technologically advanced, reliable, or easy to handle the rest of the camera may be, if the lens doesn’t provide good optical performance, it’s all in vain. Fortunately, the lenses for the Hasselblad deliver it in spades!
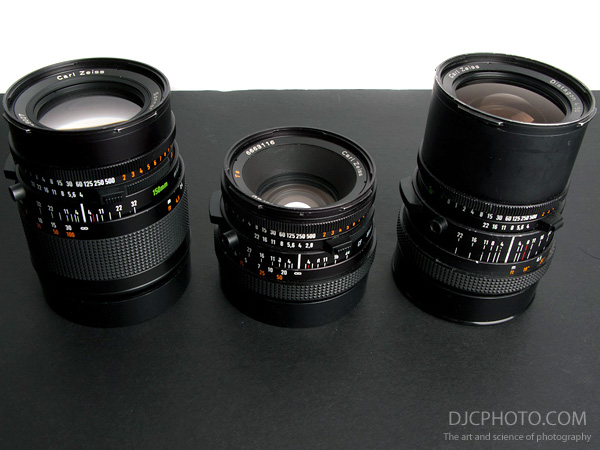
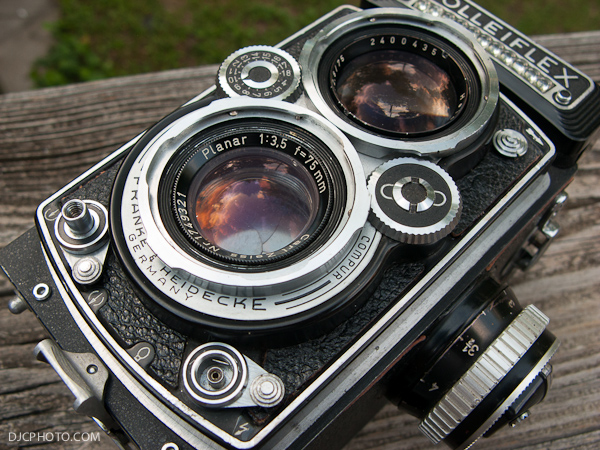
Carl Zeiss 150mm Sonnar, 80mm Planar & 50mm Distagon
Hasselblad have never been in the business of making lenses, and have always used optics from other manufacturers; from Kodak (for the 1600F) to Fuji (for the latest H series of cameras). The smartest move they ever made, however, was deciding to source this critical component of the V system from one of the most revered lens makers of all time; Carl Zeiss.
The Zeiss lenses for the Hasselblad are fantastic, and exhibit the excellent sharpness and contrast for which the German company is rightfully known. The range includes some of the classic Zeiss designs; Biogon, Distagon, Planar and Sonnar, with the 80mm Planar being the ‘standard’ lens for the system. The original lenses are known as C type, and use a Compur in-lens shutter. All later types (CF, CFE, CFi, etc.) use Prontor shutters (apart from F series lenses which are for focal plane bodies and have no shutter).
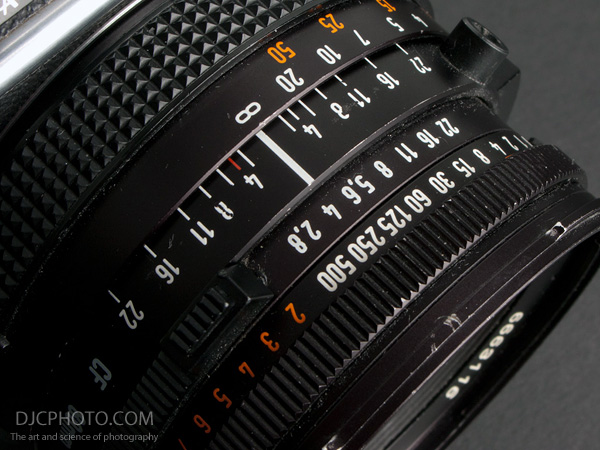
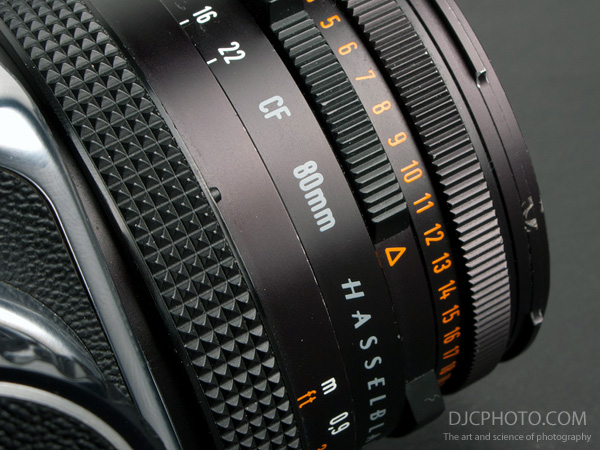
Carl Zeiss 80mm Planar lens controls
I own three lenses for my Hasselblad; 50, 80 and 150mm, all of the second series CF type. If you are not used to leaf shutter lenses, they may look a little daunting at first with all the scales, markings, rings and switches on the barrel, but they are quite straightforward in operation. From front to back, the first ring sets the shutter speed and is marked from 1/500 to 1 second, and B (bulb, for long exposures). Next is the aperture ring for controlling the diaphragm, and lastly the rubberised focus ring.
The build quality of the lenses is superb and all controls operate smoothly with shutter speed and aperture settings clicking reassuringly into place. The focusing on a well maintained lens is well damped and very precise, although this is partly due to the long throw of the focus ring. Apart from the earliest C series lenses, all Carl Zeiss lenses for the Hasselblad use their patented T* multi-coating on the front lens element which helps prevent flaring when shooting into the light and also increases contrast.
The EV Interlock System
If you look beyond the ‘500’ setting on the shutter speed ring, you will notice a range of additional numbers in orange. These are EV (exposure value) indices and, in conjunction with the small button on top of the aperture ring, allow you lock the shutter speed/aperture ratio for a given EV. To use this, take a light reading with a meter that provides an EV value and then match the orange pointer on the lens to that value by altering the shutter speed and aperture rings.
Carl Zeiss Planar EV scale
For example, if the EV reading from your meter was 12 and the aperture was set to F/2.8, we can match the orange marker to the ’12’ marker by turning the shutter speed ring to the 1/500 second setting. So we now know that, for the given light reading, the settings of 1/500 second at F/2.8 will give a correct exposure. This is all well and good if we want to use that particular combination, but what if we want to use a slower speed to allow some motion in our shot, or a smaller aperture to give increased depth of field?
On a non-interlocked system, you would have to alter either the shutter speed ring, or the aperture ring, to the required setting, and then also alter the other ring to compensate. On the Hasselblad lenses, however, you can simply depress the interlock button on top of the aperture ring and then turning this ring will also turn the shutter speed ring by an equivalent amount to retain the correct exposure value. This is extremely convenient, and makes working with these lenses very quick and easy. Although the explanation seems complicated, I assure you it is very simple in practice!
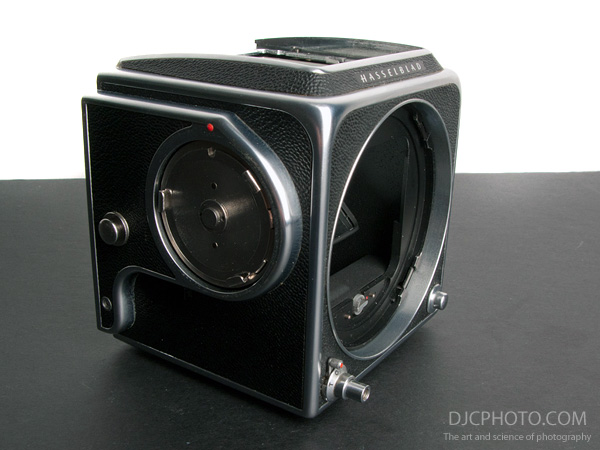
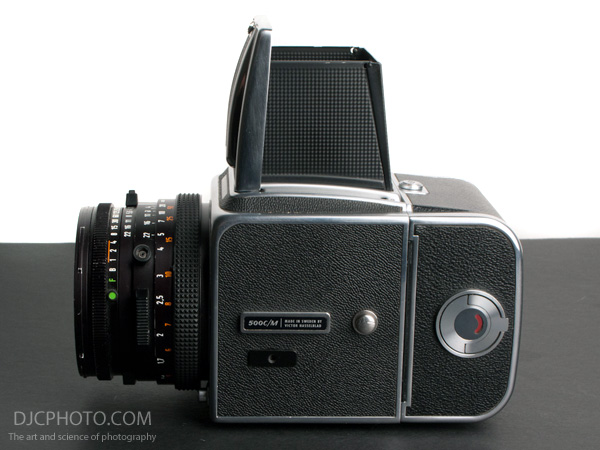
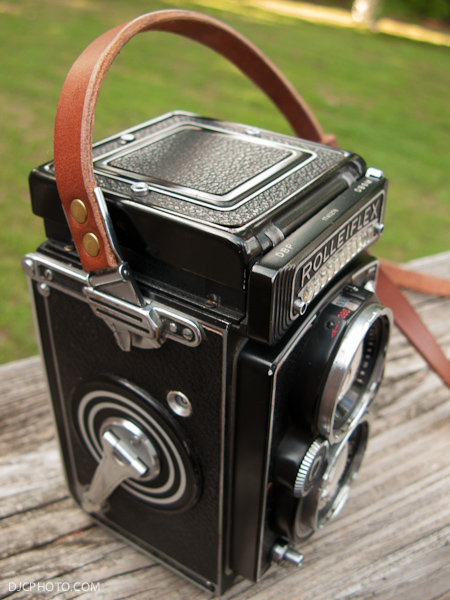
The Hasselblad Body
Hasselblad 500C/M body
To look at it, the body of a V series camera appears deceptively simple. It’s little more than a box to which you attach a lens and film back, and with a mirror and screen for viewing the subject. Once you start to consider everything that has to happen in a Hasselblad when you press the shutter release button, however, the true complexity and mechanical genius of the body becomes apparent.
So lets look at the mechanical process of making an exposure. We’ll assume that the body and lens are both in the ‘cocked’ state, and the film back is wound on to an unexposed frame with the dark slide removed. This is the default state if all components are correctly synchronised with each other. In this state, the mirror in the body will be in the down position (45 degrees, focusing the image onto the viewing screen on top of the camera) and the in-lens shutter will be open, as will the aperture diaphragm.
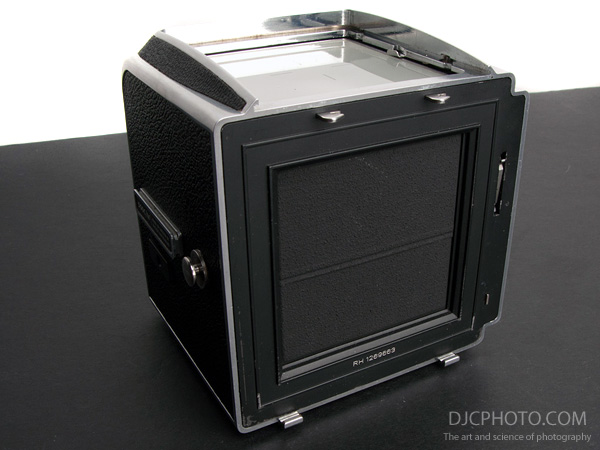
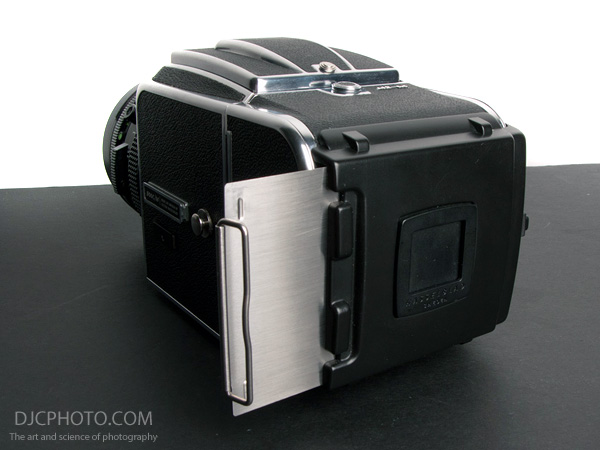
Hasselblad 500C/M rear flaps
The light-tight flaps at the rear of the body are also closed. On pressing the shutter release button, the following series of events is triggered:
The in-lens shutter is closed.
The lens diaphragm is stopped down to the selected aperture.
The mirror is flipped up out of the way of the light path.
The rear flaps open.
The shutter in the lens is released and opens for the selected amount of time before closing again.
On film backs that have this feature, the ‘exposed’ indicator turns from white to red.
That all happens when pressing in the shutter release button. Now, when you release the button, the following happens:
The rear flaps close.
The ‘ready’ indicator on the body turns from white to red, matching the indicator on the film back.
The Hasselblad 500 series cameras do not have an instant return mirror, so at this point the viewfinder will be dark as the mirror is still raised. To return the camera to it’s ready to shoot state, you need to wind the knob (or crank) on the right side of the body, which does the following:
Winds the film on to the next frame and increments the frame counter on the film back by one.
Resets the ‘exposed’ indicators on the film back and body to white.
Cocks and opens the in lens shutter.
Opens the diaphragm to the maximum aperture.
Returns the mirror to it’s 45 degree viewing position.
As you can see, there is a lot more to these camera bodies than meets the eye. If you were to look under the right panel of the camera, you would see an incredibly complex series of cogs, springs and levers that control this sequence of events. It’s a beautiful sight!
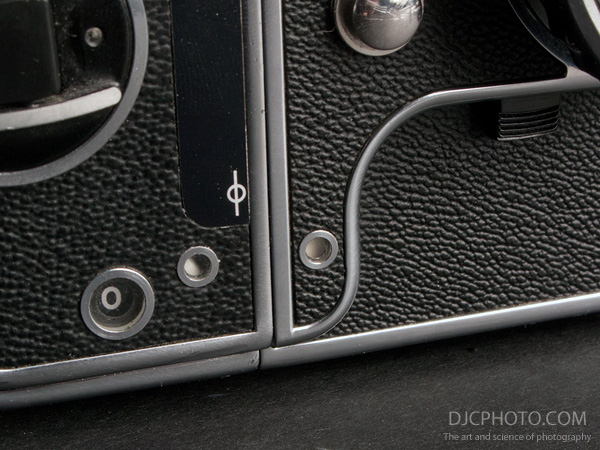
‘Exposed’ and ‘Cocked’ indicators on back and body, and mirror pre-release switch
With all of the mechanical inertia being created by that huge mirror swinging out of the way, there may be certain circumstances, such as when shooting at very low shutter speeds, where this may possibly cause a tiny amount of vibration resulting in softness in the final image. To alleviate this, there is a mirror pre-release switch directly below the film wind knob which flips the mirror out of the way. Now when you press the shutter release you only hear the soft click of the lens shutter.
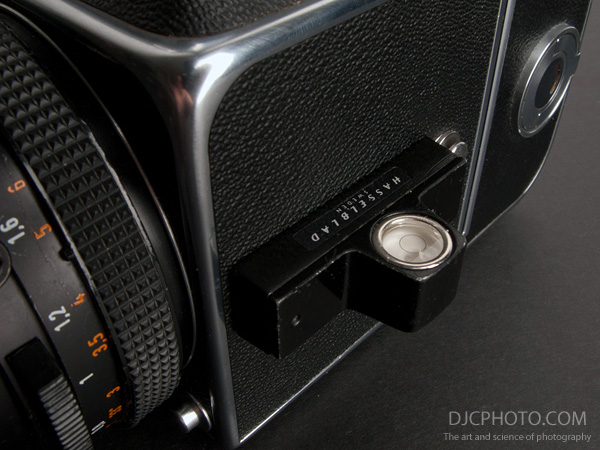
Hasselblad 500C/M accessory mounting rail
Other external features of the body are an accessory rail on the left side of the body which is used for mounting a cold shoe or bubble level, and strap lugs on either side which take specific Hasselblad connectors. On the lower front left of the body (from the viewing position) is the lens release button, and on the opposite side, the shutter release button.
The Film Backs
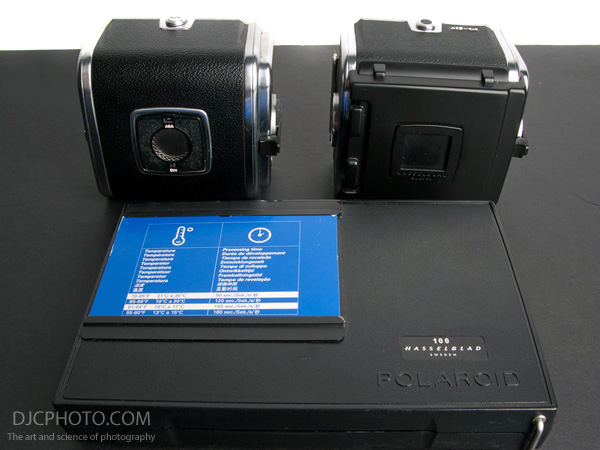
An important feature of many medium format systems is the interchangeable film backs. This allows the photographer to switch between different film stocks at will, even mid-roll. You can shoot black and white one minute, colour transparency the next, then C41, even Polaroid, without having to finish each roll first. Even if just using a single film type, you can have multiple backs preloaded with film to eliminate the need to interrupt a shoot to reload after each roll.
Old and new type A12 backs and Polaroid pack film holder
The film backs are hooked onto two tabs at the bottom of the camera body and locked into place with a catch at the top. A dark slide inserted into the side of each film back prevents the film from being exposed when not attached to the body. The is an interlock feature that prevents a film back from being removed from the body without the dark slide present, and another that prevents the shutter from being fired with the dark slide in place (more mechanical complexity/genius).
Dark slide holder on late A12 film back
Speaking of dark slides, the dilemma of where to store them once removed from the back has plagued photographers for years. They are made of thin metal and are easily bent if care is not taken. Hasselblad acknowledged this problem with the later film backs by providing a holder which safely cradles your precious slide until it’s needed. These later backs are the ones to get if possible, although they are obviously the most expensive too.
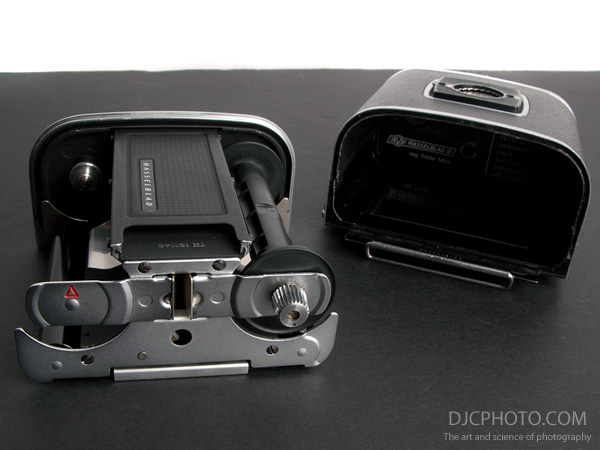
To load film you turn the key on the left side of the back and the film insert can then be slid out. The film path is fairly self-explanatory but care should be taken when new to the Hasselblad that you load it the correct way around. It’s quite a common beginners error to load it backwards which leads to 12 frames of nothing when your film is processed!
A12 film insert removed from back for loading
Various types of film backs are available, including:
A12 for 6x6cm on 120 roll film.
A16 for 6×4.5cm on 120 roll film.
A24 for 6x6cm on 220 roll film.
Polaroid back for Type 100 film packs.
There are also some other backs for 70mm perforated film and for producing 4×4 ‘super slide’ format, but these are not commonly used these days.
The Viewfinders
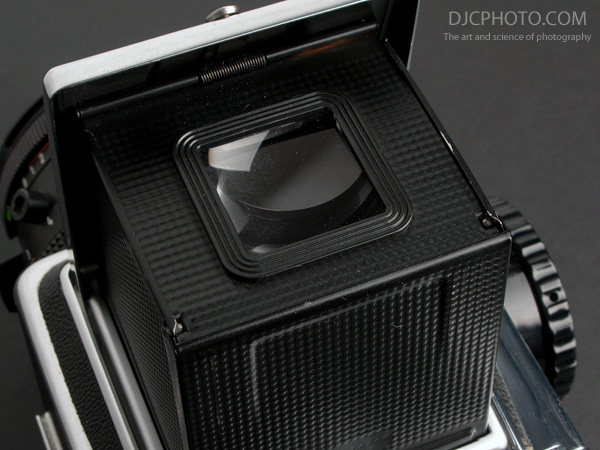
In keeping with the modular nature of the V system, various viewfinders are available for a Hasselblad. The standard finder is the collapsible waist-level finder. This is a fairly simple device that provides a flip up hood that prevents stray light hitting the focusing screen and allows comfortable viewing while looking down on the camera. For more accurate fine tuning of focus, a popup magnifier is built into the top of the hood and released by sliding the catch fully to the right. Simple, and effective. The downside is that the image is laterally reversed on the screen which can take some getting used to.
Hasselblad waist level finder with magnifer
Other finder options include a magnifying ‘chimney’ finder which is useful for critical focusing and has built in adjustable diopter correction to account for an individuals eyesight, a sports finder (basically a frame type finder for shooting at eye level while prefocused, useful for fast-moving subjects), and various models of eye-level prism finders.
The prism finders are grouped into four different types: metered or unmetered, and 45 or 90 degrees. The 45 degree finders allow slightly lower than eye-level operation that many prefer (myself included), whereas the 90 degree finders give you true eye-level operation. There have been many different metered prisms over the years, with various differences between each model. All that I have used have been accurate and simple to use, although the PME90 that I used to have was fairly complex due to it’s multiple measuring modes.
Although the prism finders add weight and bulk to a V system camera, it makes the whole medium format experience a lot more comfortable for many photographers, particularly if coming from a 35mm system.
The Other Stuff
The Hasselblad system is huge and comprehensive. Other components include a vast range of interchangeable focusing screens, a wide selection of closeup accessories (extension tubes, diopters, bellows, etc,), various grips to make handling easier, filters, cases, bags, and even some esoteric items such as an underwater housing! Suffice it to say that if you have a need for a particular accessory, it’s probably already available.
Example Configurations
Although there is no correct way to configure your Hasselblad for a particular photographic task, I’m going to show how I configure mine for a few different shooting scenarios. Everyone is different, and I’m not for one minute suggesting that these setups will be suitable for anyone else, but it will demonstrate the flexibility of this amazing system.
General Photography
Hasselblad 500C/M
If there was ever such a thing as a ‘standard’ configuration, this is it. The classic Hasselblad kit of 500 series body, 80mm Carl Zeiss Planar lens, A12 film back and waist level finder. With this setup, a light meter and a few rolls of film in your pocket, you’re ready to tackle the majority of general purpose photographic tasks. In fact, I’ve seen amazing portfolios from photographers who use only this setup (check out the excellent Hasselblad 80mm blog for some examples).
The Carl Zeiss Planar lens is legendary; it is extremely sharp, has fantastic contrast, and renders images in a very special way. The 80mm focal length provides roughly the same field of view as a 50mm lens on a 35mm camera, and it is very close to how the human eye perceives a scene, making it the perfect standard lens. Suitable for everything from landscapes to portraits (except for tight head shots as it does not focus close enough), it is the perfect lens when you want to travel light.
Going Wider
Hasselblad 500C/M with 50mm Carl Zeiss Distagon
If you like a slightly wider view on life, ditch the Planar and pop on a Distagon! This Carl Zeiss 50mm lens has a roughly equivalent field of view as a 35mm lens on 35mm film, and gives you a pleasantly wide perspective without the bulk and weight of the wider 40mm lens. The Distagon is a great lens with fantastic sharpness at the center of the frame, although it does fall off very slightly towards the edges, but this is not noticeable in all images. The T* coating provides good resistance to flare, although the lens hood is recommended for the best results. This is a great focal length for landscapes, urban scenes and environmental portraiture whilst still being hand-holdable in everything but the worst light.
Hasselblad bubble level mounted on accessory rail
When shooting with a wider angle lens it becomes more important to be aware of holding the camera level with the horizon, unless you are after a particular stylistic effect. To aid in this, I’ve made a couple of changes to this configuration. The first is to fit a grid type focusing screen in place of the regular screen which gives me a constant visual reference for aligning horizontal and vertical lines in a composition. The second is the addition of the Hasselblad bubble level which slides onto the accessory rail on the left side of the camera body.
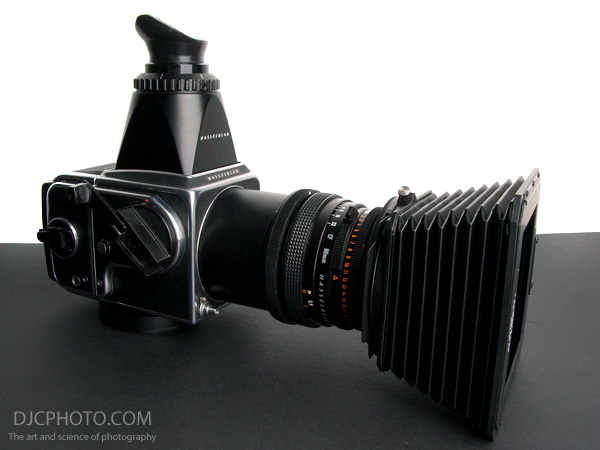
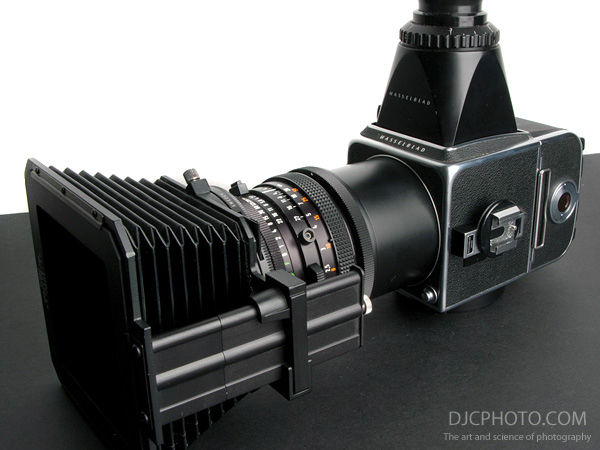
Macro Photography
Hasselblad 500C/M macro photography configuration
Macro or closeup photography is very well catered for in the Hasselblad system. The Proxars are glass diopters that attach to the filter mount of your lens and provide close focusing (the closest focusing distance is determined by the strength of the diopter). These are very convenient to use and, unlike extension tubes and bellows, they do not require any exposure compensation when using them.
Personally, I prefer the extension tubes, and they are available in various extension lengths, from 8mm to 55mm. They mount on the body and your lens then mounts onto the tube. Unlike the Proxars, you are not adding any additional glass elements into the image path, so you do not get any degradation of sharpness or other unwanted aberrations when using them.
Hasselblad 500C/M macro photography configuration
Although you can use the larger tubes for true macro photography, the smaller tubes are also very useful for reducing the close focusing distance enough to enable tightly framed head shots, and for this the 8mm and 16mm tubes are perfect for the 80mm and 150mm lenses respectively.
The setup shown will focus very close, enabling me to fill the frame with the smallest of objects. The 80mm Planar lens is mounted onto a 55mm extension tube, and I also use the magnifying chimney finder to aid in critical focusing as the depth of field is greatly reduced as such close distances (high magnifications). A compendium hood ensures that no contrast-robbing stray light hits the front of the lens.
See an example macro studio setup, and a few examples, here.
Portrait Photography
Hasselblad 500C/M with 150mm Carl Zeiss Sonnar
I am a huge fan of tightly cropped portraits, either head shot or slightly less than quarter length. I also prefer to use a prism finder to bring the camera level up nearer to the sitters eye level. Victor Hasselblad designed the V system camera to be operated at waist or chest level, and it is ergonomically perfect when shot in this manner. At eye level, however, it is not the most comfortable camera to use unaided. The solution, for me at least, is to use the left hand flash grip. This inexpensive accessory bolts onto the camera using the tripod bush and provides an extremely comfortable solution for eye level shooting.
The prism I use is the original 45 degree PME metered finder. Once you’ve set the maximum aperture of the lens you are using, and the film speed, a quick press of the front mounted power button will give you an accurate through-the-lens light reading of your scene. The readout in the viewfinder is in EV (Exposure Value) and it’s a simple job to transfer this reading to the lens (all V system metered prisms are uncoupled and require manual setting of the lens to match the metered value).
Hasselblad 500C/M with flash grip
My favourite lens for portraits is the 150mm Carl Zeiss Sonnar and it is shown here in conjunction with a 16mm extension tube as this lens is not known for it’s close focusing capabilities! The Sonnar design makes for beautifully rendered portraits without being too sharp (your clients will thank you)!
Although this setup looks bulky and heavy, it handles surprisingly well with your left hand on the grip and your right cradling the underside of the lens, where it can also handle focusing, shutter speed and aperture adjustments. The grip has a trigger release built in for even more convenience, and a cold shoe on top which is useful for mounting a radio popper for triggering your strobes.
Conclusion
Hasselblad 500C/M
There are many reasons why I love the Hasselblad 500C/M; the mechanical precision, the quality feel that you only get from a hand-built machine; I even love the almighty clatter it makes when you release the shutter! But, above all, it’s the quality of the results that keep me coming back to this system. The Carl Zeiss lenses are unmatched, and every time I pull a freshly developed roll out of the tank I am blown away by the images that this thing produces, roll after roll after roll.
Hasselblad 500C/M
It’s also a camera that simply does what you tell it to do. You are in control of all aspects of the image making process, without a computer making exposure or focusing decisions for you. In fact, if you produce negatives or transparencies that are not of the highest technical quality, you only have one person to blame!
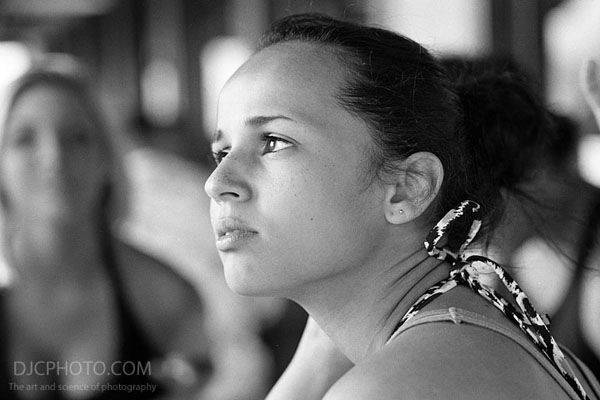
Apart from a few taken with my Rolleiflex, the majority of the square format images in my portfolio were shot with a Hasselblad. All images in this article shot with a Canon G9, except for the lead image of Kendra, for which I used a Nikon D2X.
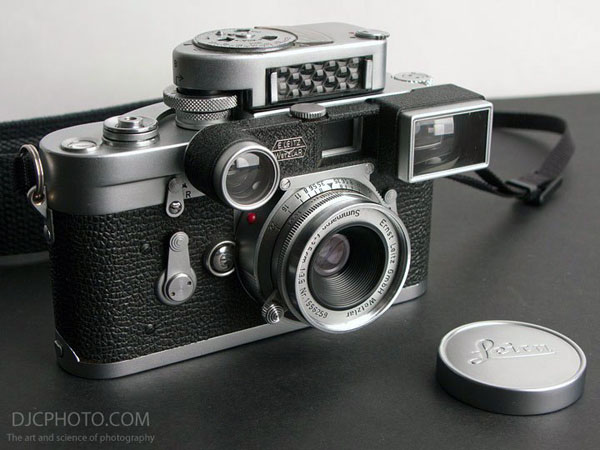
Launched as a screw-mount lens in 1949, and in M bayonet mount in 1956, the 35mm F/3.5 Summaron is a beautifully made lens and, although it can’t compete in performance with later Leitz 35s, it is still capable of producing very pleasing results.
My 1958 copy is in pretty nice condition cosmetically, and is the M3 version with ‘goggles’. The viewfinder on the Leica M3 only has frame lines for 50mm, 90mm and 135mm lenses, so this viewfinder attachment corrects the field of view to match that of the lens and allow accurate framing.
Leitz Summaron 35mm F/3.5
The goggles are detachable for ease of carrying or storage by loosening the screw on the top of the housing, but can only be removed with the lens focused on infinity and, after removal, the lens is then locked at infinity.
Leitz Summaron M3 goggles
Leitz Summaron 35mm F/3.5 with goggles removed
Unfortunately, these Summarons are prone to developing haze on the lens elements, particularly on older examples, and mine is no different. This haze is difficult to see without shining a bright light through the lens, but it’s quite obvious when you do.
Leitz Summaron 35mm F/3.5
The potential effects of this are reduced contrast and flaring, most noticeable when shooting contre-jour. Sure enough, my lens flares more than a pair of David Bowie’s trousers, as can been seen in the following photographs.
Effects of haze in Summaron 35mm F/3.5
Effects of haze in Summaron 35mm F/3.5
I still love the look I get from this little lens and, in fairness, some of this flaring could have been reduced if I’d been bothered to use a lens hood (note to self: use a hood!). I like it enough that I’m probably going to send it to be professionally cleaned which will fix the problem. In the meantime, however, I’m just going to use it as is. In fact, I quite like the lens flare, and I’m going to treat it as a feature, rather than a fault!
Framing more carefully to reduce any bright direct light results in more even contrast, as seen here.
Leitz Summaron 35mm F/3.5
Shooting under better controlled light reveals that the Summaron is quite a snappy little lens, with good sharpness.
Leitz Summaron 35mm F/3.5
Like all Leitz lenses, prices on these Summarons have been on the rise lately, but it’s still one of the better bargains in Leica land. Current prices seem to be around the $400 mark, but better deals come around every now and again.
Leitz Summaron 35mm F/3.5
Examples in this article were shot on Fuji Neopan 400 and developed in Kodak HC-110, dilution B.
I should start by saying that this is not a technical review of the rigid Summicron; there are no shots of Air Force test charts or brick walls, and no lines-per-millimetre resolution tables, nor any comparisons with other similar lenses. This is simply a brief overview of the lens and a series of photographs of a friend I took last weekend. Technical reviews certainly have their place but, for me, what is important is how a lens performs in real-world situations, so that is how this review is written.
Like all Leica lenses, the Summicron is extremely well made.
My particular copy of this lens is one of the first 2000 made, and dates from 1956, the year of this model’s introduction. The glass is in very nice condition and not inflicted by the usual cleaning marks on the front element, nor any fogging or fungus. Mechanically, it is also in great shape with smooth focusing and positive aperture click stops.
The Summicron is a compact lens, but no lightweight at 340 grams due to it’s all metal construction of the barrel, focusing and aperture mechanisms. That said, it handles very well on the compact Leica M bodies, with the balance being almost perfect on my M3.
In use, this is an incredibly sharp lens, and has a very distinct way of rendering out of focus areas (bokeh). Overall it gives a very pleasing ‘vintage’ feel to images, particularly in black and white, and is my most used lens for my Leica.
Here are the photos, taken at the Grist Mill in Norris, Tennessee, on Fuji Neopan 400 film.
I’ve had my 1957 Leica for about six weeks now and I think I’m finally getting to grips with using a rangefinder camera after years of shooting SLRs. I have found that it really requires quite a rethink of shooting style, focusing technique, etc. to get comfortable with using one.
I took the M3 with me to meet a few friends at a local hostelry this weekend and I think it all finally clicked into place! Focusing seemed natural, and shooting speed (framing, etc.) all came together very well.
90mm Elmarit
Here are a few of the results, shot with either 50mm rigid Summicron or 90mm Elmarit, on Kodak Tri-X film, processed in HC-110 dilution B.
Many others have written about the technical reasons as to why the Rolleiflex twin lens reflex cameras were, and remain, such an enduring success (large negative size, superb lenses, etc.), so I’m not going to reiterate any of that here. Apart from all those reasons, and in my opinion, the Rolleflex cameras are some of the most beautifully designed cameras of all time, and are works of art in their own right.
This article, therefore, is just an excuse to post some photos of the three cameras I own; pure ‘camera porn’, if you will. In an age when camera design has morphed into the current black plastic blob aesthetic, I think it’s an apt reminder of a level of craftmanship that has sadly become a lost art.
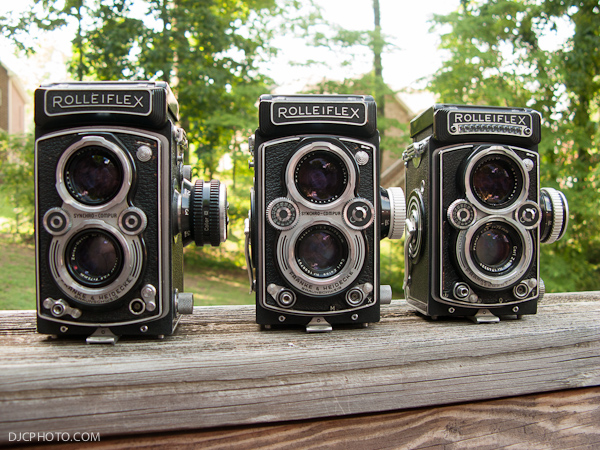
L to R: MX, MX-EVS and 3.5 E
Admittedly, I have a soft spot for twin lens cameras; my Dad used to shoot with a Yashica E and I remember as a young boy being completely fascinated with this camera. Apart from that, the negatives he made of our travels around the world have survived the test of time very well, and the quality that the 6×6 negative brings to the table is still readily apparent when viewing them even today.
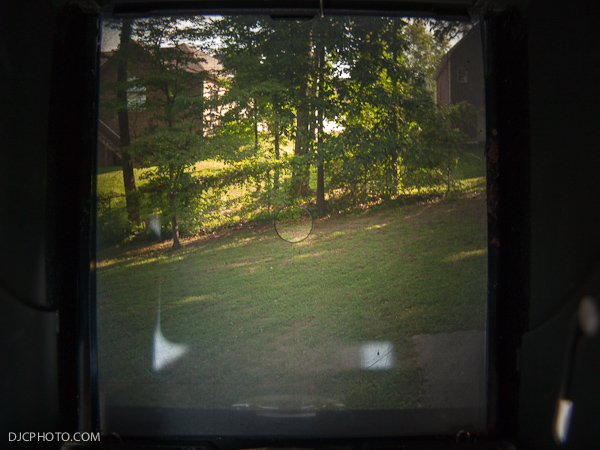
One of the things I love most about these cameras is the view through the waist-level finder. If you are used to squinting through the tiny eye-level finder of a modern DSLR, the huge image you’ll see on the ground glass screen of a Rolleiflex is a revelation! Yes, the view is laterally reversed, which causes some initial disorientation if trying to track a subject, but being able to see the entire frame that will be captured on film is a fantastic way to compose a photograph.
View through the Rolleiflex waist-level finder.
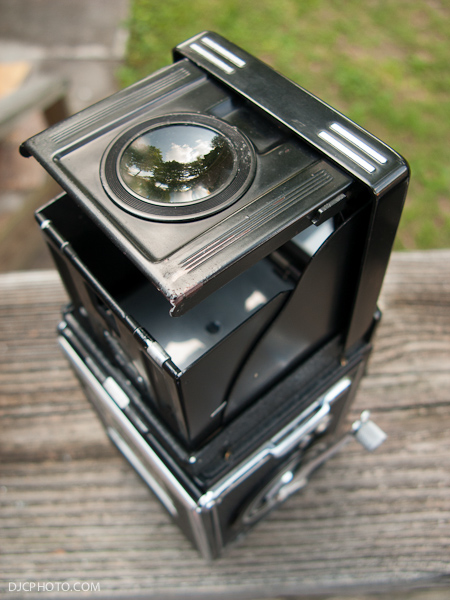
The finder hood also incorporates a magnifier for critical focusing. When open, pulling upwards on a small catch on the inside of the hood causes the magnifier to pop up.
Magnifier for critical focusing.
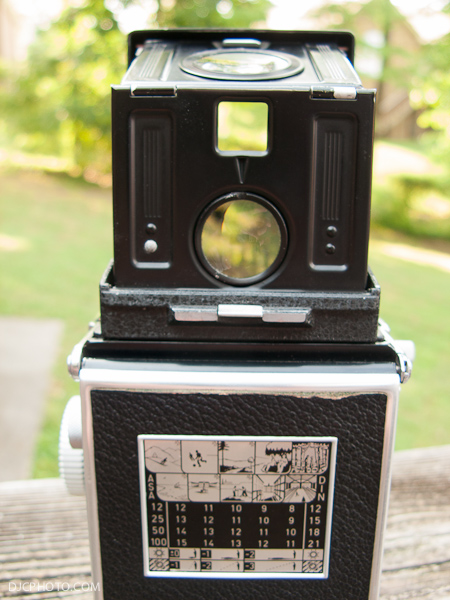
With the magnifier raised, pushing in on the front panel of the hood engages the third viewing option, the direct view. In this configuration you have a direct eye-level view of the scene though a small frame in the rear of the hood. This is useful for tracking subjects because it is not reversed as in the other viewing modes. Just below the direct view window, a clever system of a secondary magnifier and a small mirror gives you a reversed view of the central portion of the ground glass for focusing.
The direct view and the focusing view are close enough together to enable quick switching between both. Pushing down on the silver catch below the magnifier returns the hood to it’s original position. This is another reminder of the ingenious mechanical and optical design of the Rolleiflex.
Direct view, with secondary focusing view below.
For a medium format camera that produces 6×6 cm negatives, the Rolleiflex is fairly compact. With the hood folded down, and the film wind crank stowed, it makes a comfortable ‘brick’ that is easily carried. Also, because it has a fixed lens, there is no temptation to load up a bag full of extra lenses when you go out to shoot. A Rolleiflex, a light meter, maybe a filter or two, and a few rolls of film is all you need.
When not shooting, the Rolleiflex is relatively compact for a medium format camera.
Not everyone can get on with the ergonomics of a twin lens reflex camera, and some just hate the waist level viewing, but I find the Rolleiflex great to use in that respect. With the camera on a strap at waist level (beer gut level, in my case), all the controls fall easily to hand.
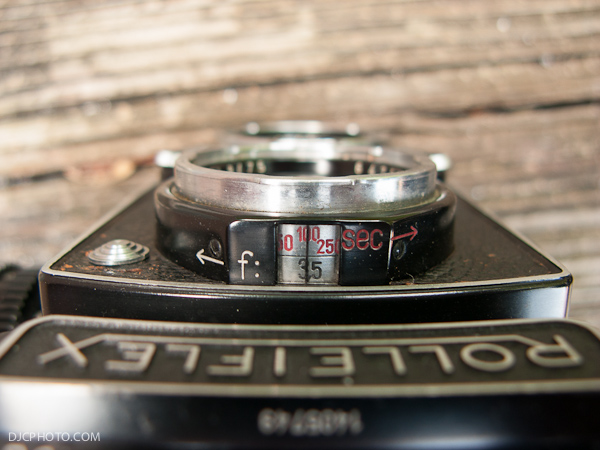
Focusing is achieved with the large knob on the left (looking down) and the film is advanced with a fold-out crank on the right. Aperture and shutter speed are set using the two wheels between viewing and taking lenses, and the chosen settings are viewable in a small window above the viewing lens.
Aperture and shutter speed settings window.
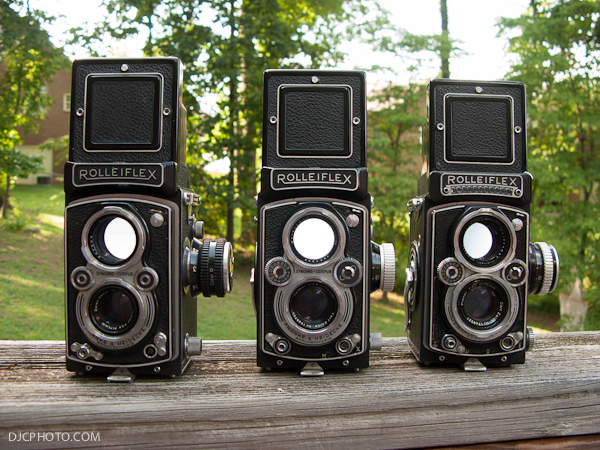
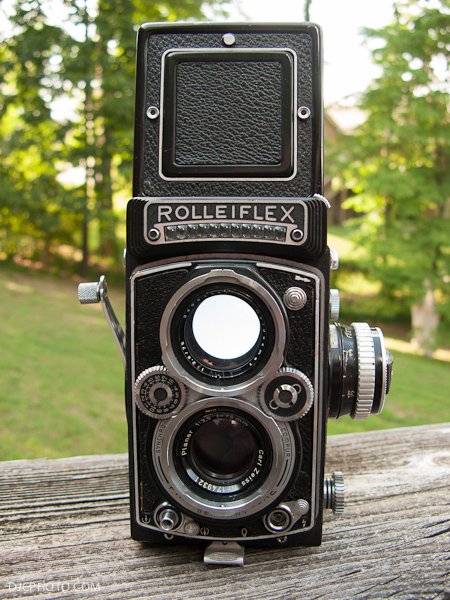
As shown in the ‘family portrait’ at the beginning of this post, I now have three Rolleiflex cameras. None of these are collector grade and they all show signs of fifty plus years of use, but they all perform beautifully.
1954 Rolleiflex Automat MX (Model K4A)
When I bought my Leica M3 last year, the retired photographer I got it from also sold me his MX which had been his main camera for portraits for over forty years. His career included working in a studio in New York where he photographed various famous and celebrity clients (he has negatives taken with this camera of Eleanor Roosevelt, amongst many others).
Although it’s a little cosmetically rough around the edges, it was obvious when I handled it that he had taken very good care of the camera; it is probably the smoothest and quietest of all three cameras, which validates his claim that, although he worked it hard, he also had it serviced regularly.
1954 Rolleiflex Automat MX (Model K4A)
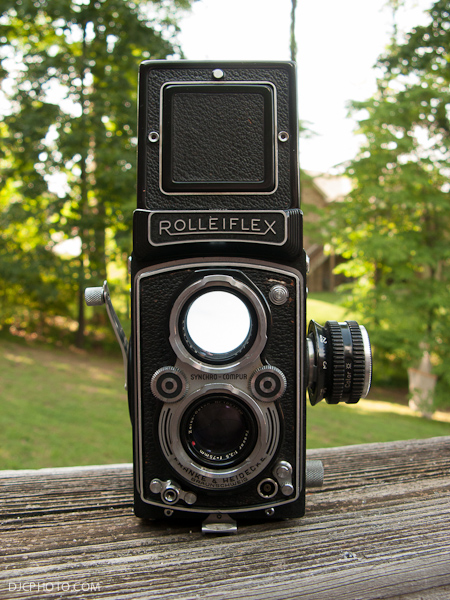
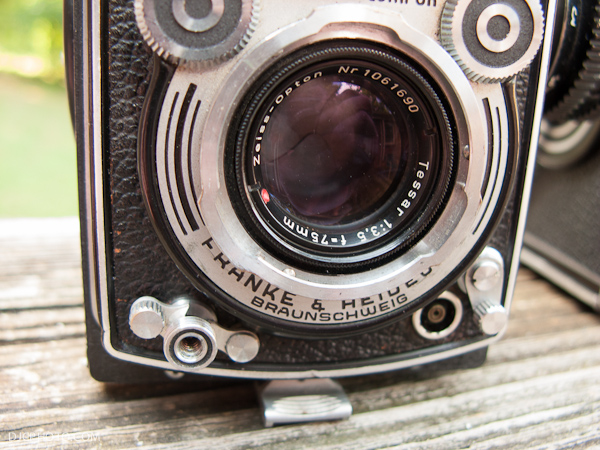
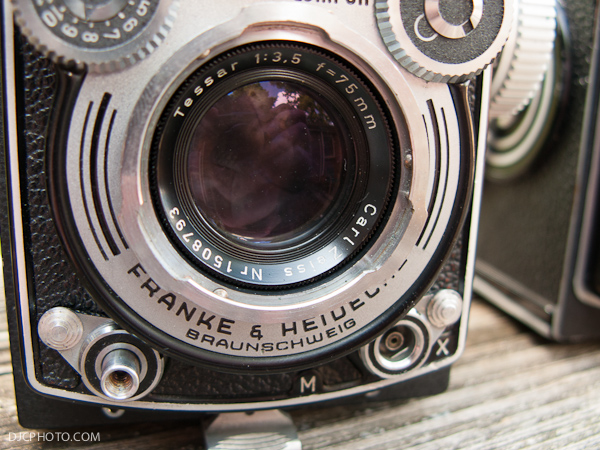
This particular example is fitted with the Zeiss-Opton Tessar 75mm F/3.5 taking lens. Variations for this model included the Zeiss Jena Tessar and the Schneider Xenar.
1954 Rolleiflex Automat MX (Model K4A).
The MX has a much smaller focusing knob than later models so I added the Rollei extension knob to mine to make focusing a little more comfortable.
1954 Rolleiflex Automat MX (Model K4A) with extension focusing knob.
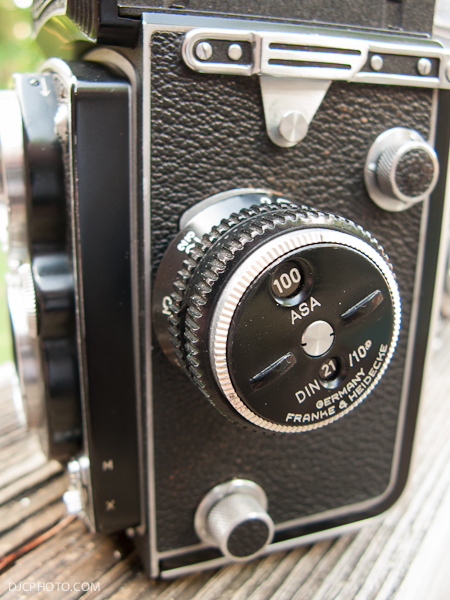
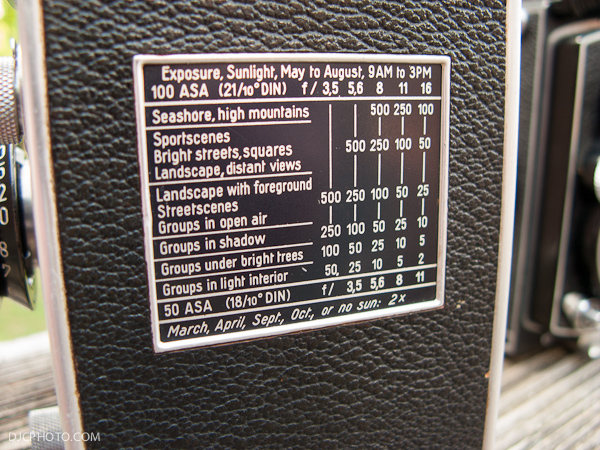
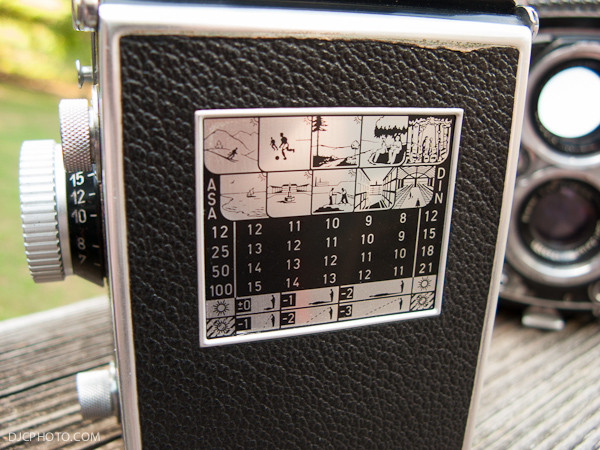
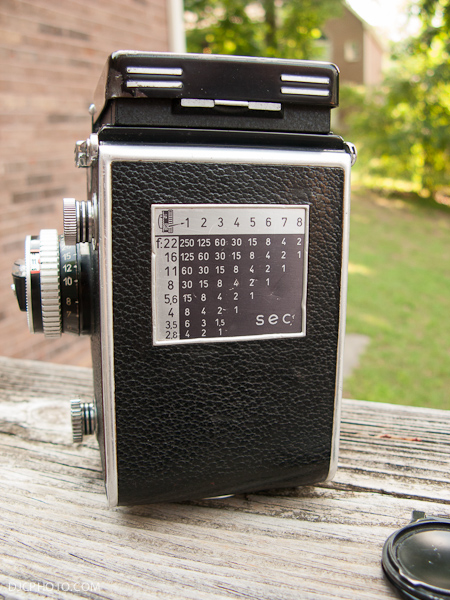
There is no built-in meter on the MX model, so a simple exposure chart is included on the back of the camera which gives approximate settings for various lighting conditions.
The red star on the taking lens denotes that the lens is coated to reduce flare and increase contrast.
1954 Rolleiflex Automat MX (Model K4A).
1956 Rolleiflex Automat MX-EVS (Model K4B)
This was my first Rolleiflex, purchased about three years ago. The slow shutter speeds were off so it needed stripping down and cleaning but it now works great. Rolleiflex focusing screens are notoriously dim but this camera has had a replacement fitted and the viewfinder is nice and bright.
1956 Rolleiflex Automat MX-EVS (Model K4B).
The Carl Zeiss Tessar taking lens, although a relatively simple design, is very contrasty and incredibly sharp! Notice the new style accidental exposure prevention lock around the shutter release button (bottom left of the photo).
1956 Rolleiflex Automat MX-EVS (Model K4B).
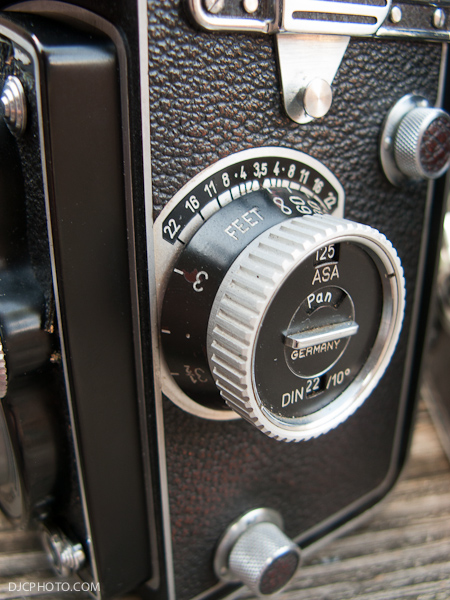
The MX-EVS also has the later, larger focusing knob; no need for an extension on this one! The scale on the camera body helps determine depth of field.
1956 Rolleiflex Automat MX-EVS (Model K4B).
A meterless camera like the MX, the MX-EVS also has an exposure guide on the back, although the simple text explanations have given way to cryptic little diagrams.
1956 Rolleiflex Automat MX-EVS (Model K4B).
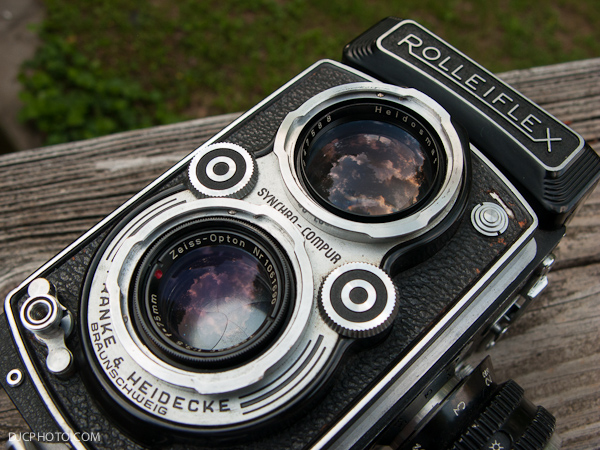
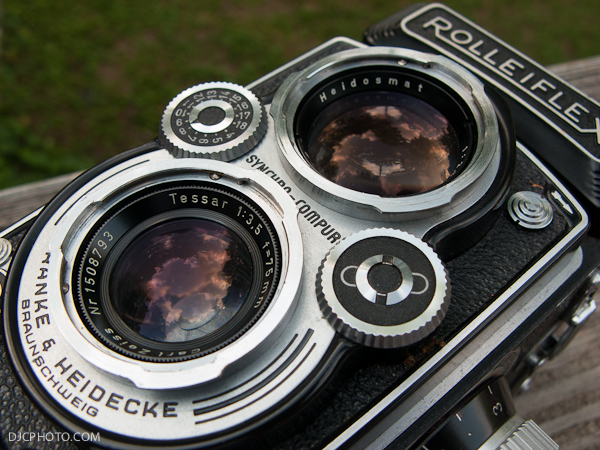
All three of my Rolleis have the same viewing lens; the Heidosmat 75mm F/2.8.
1956 Rolleiflex Automat MX-EVS (Model K4B).
1956 Rolleiflex 3.5 E (K4C)
My most recent find is this 1956 model E. You can read more about how I got it, and the work it needed, in this post.
1956 Rolleiflex3.5 E (Model K4C).
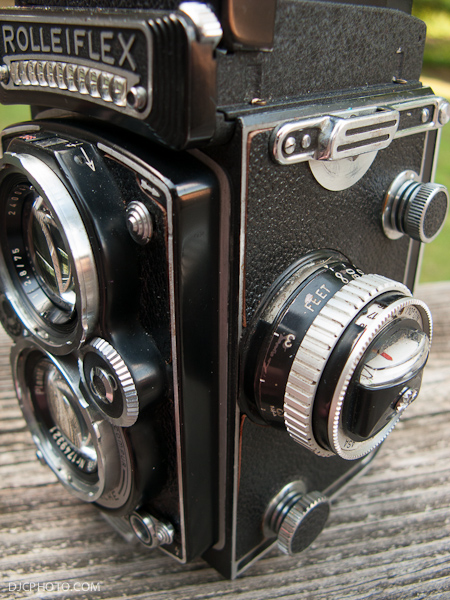
This is the only of my Rolleis that has a built-in meter, although it’s currently non-functioning. It uses a selenium cell mounted above the viewing lens.
1956 Rolleiflex3.5 E (Model K4C).
The meter display protrudes from the focusing knob, and it gives you an exposure value (EV) for the prevailing light conditions.
1956 Rolleiflex3.5 E (Model K4C).
The EV reading from the meter can be converted to aperture and shutter speed settings using the conversion chart on the rear of the camera.
1956 Rolleiflex3.5 E (Model K4C).
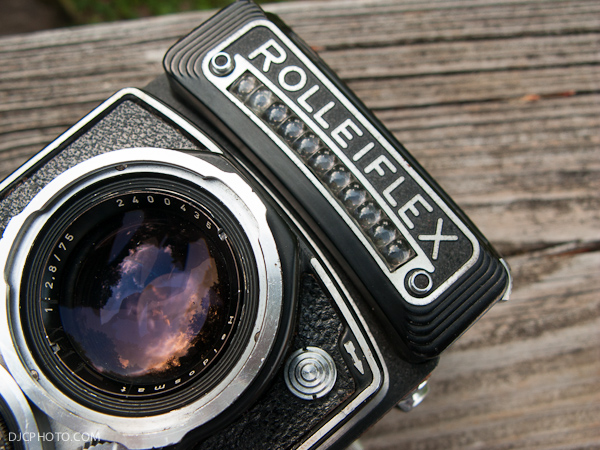
The coated 75mm F/3.5 Carl Zeiss Planar lens fitted to this camera is legendary for it’s contrast and sharpness, along with exceptional flatness of field across the entire negative area.
1956 Rolleiflex3.5 E (Model K4C).
This camera came with the original strap with it’s hard to find ‘scissor’ connectors, but the fifty year old leather was rotted and weak. Dee took the old strap to a leather worker and had the strap replaced with new strong leather, while retaining the original mounting hardware. Good for another fifty years now!
1956 Rolleiflex3.5 E (Model K4C).
I’ve been asked why I need three Rolleiflex cameras, and the answer is simply that I don’t! However, I’ve managed to buy all three at very good prices, and the images they produce are subtly different from each other due to the various lenses fitted, so I’m going to keep and use all of them.
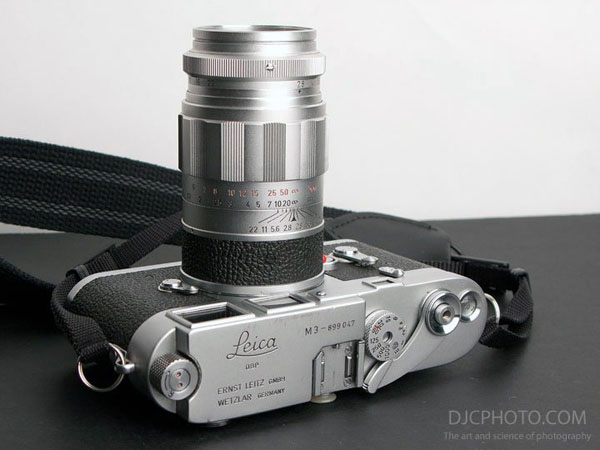
Early in March 2011 I received a breathless call from a friend who knew I had been looking for a rangefinder camera. He told me he had just been speaking to a retiring photographer from a nearby town who had a Leica M3 camera outfit for sale. He had seen and handled the gear and said that it all looked in pretty good condition for its age.
The price was great so, trusting my friends judgement, I took a leap of faith and told him to go ahead and get it and I would reimburse him later that day. I’m glad I did! It turned out that this outfit contained everything I could have wished for; a complete working system, ready to start shooting with.
The body is a 1957 ‘double stroke’ Leica M3 camera and shows some typical signs of having been used, but not abused. There are some scratches and bright marks on the top of the camera from the slip-on meter, one small dent, and a tiny peice of the vulcanite body covering missing. Overall it is in great condition and feels very solid.
I wanted to get it fully checked out before using it on any serious shoots so I shipped it off to Youxin Ye, a respected repairman, for a CLA (clean, lubricate and adjust). At the same time I also ordered a lens adapter so I could use the Summitar lens that I already owned on the M3. Turn around time for the service was a very quick ten days (including shipping both ways) and it came back feeling fantastic! The film wind is super smooth, the shutter extremely quiet and the rangefinder very bright and accurate.
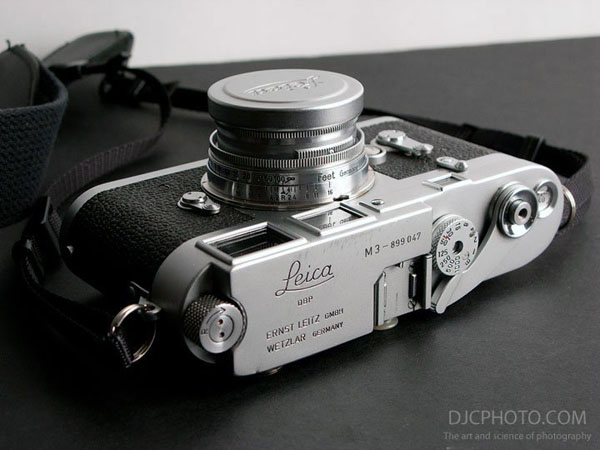
Here is the camera with the 50mm Summitar attached. This is a great compact configuration.
M3 with 1946 50mm Summitar
The Summitar is excellent. This particular lens was made in 1946 and has a coated front element and the ten blade round iris configuration (later lenses switched to a six blade hex iris configuration). As mentioned above, I already owned this lens and have used it extensively on my Leica iiif screw-mount body. When shot wide open, it produces images with a lovely vintage character; low contrast and a little soft, but very attractive. Stopped down it also gets pretty sharp, especially in the center of the frame.
M3 with 1946 Summitar
The biggest problem with the Summitar is that it is almost guaranteed to flare in bright conditions, reducing contrast even further, so the use of a lens hood is mandatory. Although not shown here, I have the Leica ‘barn door’ hood which provides the best solution to this problem, at the cost of looking absolutely ridiculous!
M3 with 1946 50mm Summitar
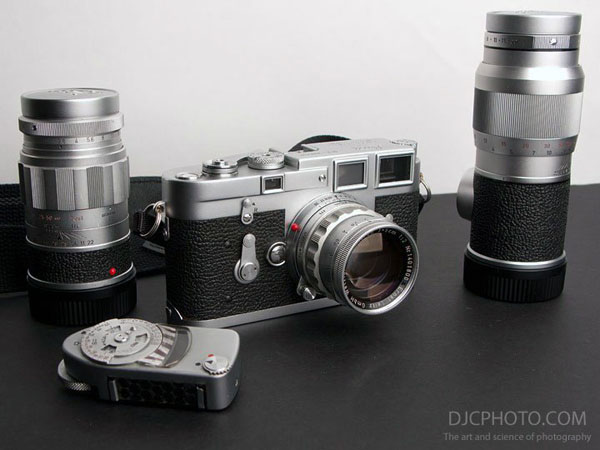
“So what else was in the outfit?”, I hear you cry!
Well, there were four lenses, and I’ll start with the widest, a Leitz Summaron 35mm F/3.5. Made in 1958, this version was designed specifically for the Leica M3. The M3 camera doesn’t have frame lines in the viewfinder for the 35mm focal length, so the solution was to attach a set of ‘eyes’ or ‘goggles’ over the viewfinder components so that the angle of view and magnification is correctly shown for accurate framing. Although they look a little odd, and are undeniably bulky, they work very well.
M3 with detached Summaron 35mm F/3.5M3 with Summaron 35mm F/3.5 and Leicameter MC
With a maximum aperture of F/3.5, this Summaron could never be considered a ‘fast’ lens (Leitz also made a F/2.8 version), but from what I’ve seen so far, it’s a great little performer when you have enough light. I’ve not tested it extensively yet, but the few frames I have shot show pretty good sharpness when closed down a few stops. Like a lot of lenses from this era, it’s a little low on contrast, but still very useable. On a more positive note, another trait it shares with lenses from this period is it’s incredible build quality; it really is a masterpiece of mechanical and optical engineering, and a delight to use!
M3 with Summaron 35mm F/3.5
Next up is the star of the show, a 1956 50mm F/2.0 Leitz Summicron. The Summicron was the successor to the Summitar mentioned earlier, and was initially offered in a collapsible version for the Leica screw mount. In fact, the first collapsible version looks almost exactly like the Summitar. This version, however, is the non-collapsible second type, using the M mount, and is often referred to as the ‘rigid’ Summicron.
M3 with 50mm Summicron
This lens is in great condition optically. The barrel has a few cosmetic issues that come from fifty years of use, but that adds to the charm. It is a lower contrast lens than the modern equivalent and, again, prone to flare with a strong light source in the image. That said, I have been amazed at the quality of the negatives I’ve shot with the Summicron. The detail it resolves is astounding and, although I have used sharper modern lenses, it’s certainly no slouch in that department either. Destined to become one of my favourite lenses, I think!
M3 with 50mm Summicron and Leicameter MC
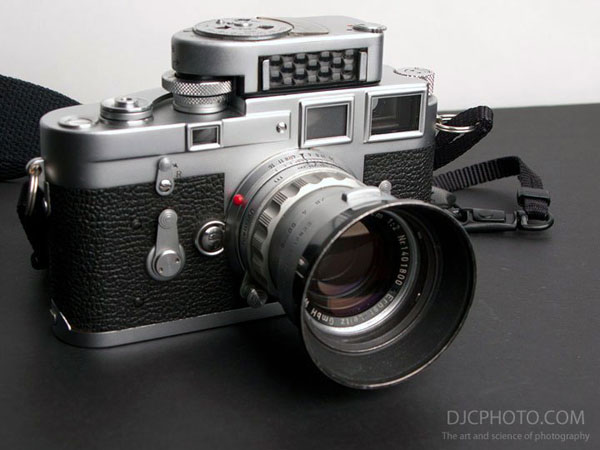
The Leica M3 camera has three framelines available in the viewfinder; 50mm, 90mm and 135mm. The 50mm focal length is now taken care of, so we’ll move on to the next lens, the 90mm F/2.8 Elmarit. Made in 1960, this is a lovely lens for portraits, and looks great with the black vulcanite trim on the silver barrel! Again, it’s in very good condition, and snaps into focus in the viewfinder.
M3 with 90mm Elmarit
I just love this lens! I’m primarily a portrait photographer and the Elmarit is fantastic for people pictures. Sharp, without being too sharp (you can thank me later, ladies), and with a very smooth and pleasing rendition of out-of-focus areas. I made some 8×10 enlargements of negatives shot with this lens a few nights ago and they look incredible!
M3 with 90mm Elmarit
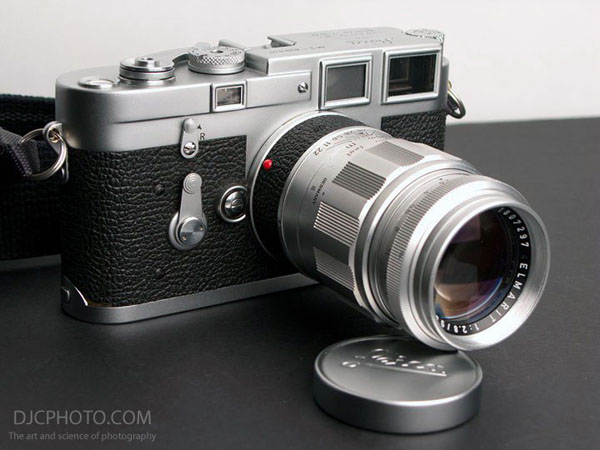
The final lens is a 1961 135mm F/4.0 Leitz Elmar. I’ve only shot a few frames with this lens so far so I’ll leave any comments on image quality for a later post, but the condition is great and it’s beautifully constucted. I have never used a lens longer than 90mm on a rangefinder camera before and I’m looking forward to see what this can do. It could be very nice for tight headshots…
M3 outift (135mm Elmar on right)
So there it is; my new Leica M3 camera outfit! I also got the slip-on Leicameter MC seen in a few of the photos (although I’m not convinced it’s accurate anymore so I’ve been using a hand held meter) and various lens hoods and caps. It all fits nicely into a small Domke bag and I’ve been carrying it with me everywhere I go. I got really lucky finding such a complete kit locally for such a good price, and I can see this becoming my go-to kit for 35mm film shooting!
Stay tuned for reports on the individual lenses as I start using them on shoots over the next few weeks.
Although I have a range of photographic gear for different tasks, the majority of what I shoot is handled by two cameras, both of which fit into a single bag that goes with me every day. The bag is my trusty Domke F6, which I’ve posted about before. It can be tempting to throw everything you own in the car just in case you need it, but the reality is that what I can fit into this little bag will take care of 90% of the subject matter that I photograph.
I’ve moved things around a little since that last write up, so I thought I’d post of picture of the current layout and contents.
In top flap – cable release, lens cloth, business cards and misc. small accessories.
Film for both cameras (10 rolls 35mm, 6 rolls 120, approximately) and Giottos Rocket air blower.
Not shown – Kindle in rear outer pocket, in case I get bored!
It’s a pretty complete outfit, and still manageable weight-wise. I’m not sure I’d want to carry it around for 7 or 8 hours a day, but as a small bag to chuck in the car, and for shorter walks, the Domke F6 works a treat.